 Sometimes, you just need to get things down on paper – even when you’re working in Smartsheet. Whether you need printed PDFs to pass out for a meeting or want to discuss your project schedule with someone without having them log in to Smartsheet, knowing how to customize your Gantt PDF can help you out when you need to take things offline.
This week we’re going to walk through a few different ways to customize your Gantt chart print- outs with five simple tips.
Before you can print your Gantt chart, you need to create a PDF of your sheet. Click the Print icon in the left toolbar  to get started.
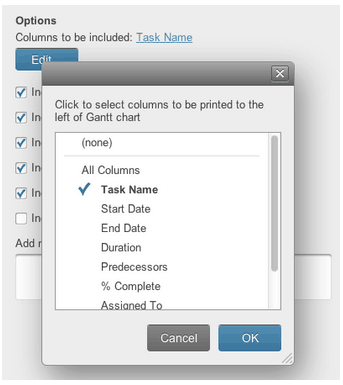
- Tip #1: Decide which columns you want to include.
By default, only the Primary Column of your sheet will be displayed next to the Gantt chart in the PDF. It’s easy to add more context to your print out, simply add more columns from your sheet. Customize the columns that will print by clicking the blue Edit button under Options of the print menu.

- TIP #2: Print consistent pages.
If you have a lengthy project, the width of your Gantt chart can extend across multiple pages of your PDF. To ensure the rows align properly across the pages, you can adjust a setting in the printing options. With the Primary Column consistently adjacent adjacent with associated Gantt bars to the right, choose the Fit to Width option from the Scaling section at the bottom of the Print Setup menu.

- TIP #3: Make your PDF legible.
The longer your project is the more space its associated Gantt chart will require – so if your project extends over multiple months, it can looked really compressed in a Fit to Width PDF.
You can still fit your project on one page, you’ll just need to condense the timeline of your Gantt chart to make the Gantt bars smaller. An easy way to do this is to track your longer projects in quarters rather than weeks. With this adjustment, your Gantt chart will take up less space and will be easier to read on one page when you export to a PDF to print.
To quickly change the timeline display of your Gantt chart, use the Zoom Out magnifying glass icon underneath the Gantt chart’s header. (Further control the timeline by Editing the Gantt Settings).
 ... Zoom Out from Months/Weeks view
 ... To condense your timeline to Quarters/Months
- Tip #4: Take a snapshot.
When you’re working with a lengthy project schedule, you don’t always need to look at the entire project. Print out a custom date range to hide bars from your Gantt chart that take place outside of the selected range, like your project’s completed tasks or due dates outside of the current year. This is also a good option if the Gantt chart looks "squished" or illegible when you select Fit to Width.

When you’re customizing your dates, make sure to take note of your Gantt chart timeline when you select a custom date range. The custom date range won’t reflect fractions of your Gantt chart’s timeline increment. For example, if your Gantt chart's primary heading (timeline increment) is set to Months, and your custom date range is the last 2 weeks of that month, the entire month will still be included in the PDF. To narrow the date range, use the Zoom In icon to change the primary heading back to weeks, and you’ll be able to print out a two week portion of your project.
You can also apply filters to your date columns to export a custom date range, or to other columns to print certain rows based on their criteria.
- TIP #5: Automatically email your PDF every day, week, or month.
If someone needs to review a quick update on the project schedule on a recurring basis, schedule a recurring email with your project’s Gantt chart PDF attached. Click the envelope icon  in the left toolbar and select Send as Attachment.
Click the Options link to configure the PDF, and the Schedule link to set up the automatic recurrence.
Whether you need to head into a status meeting with handouts for your entire team, or take a print out from the last two weeks with you for quick reference, you can use these tips to print what you’d like in the best format for your needs.
Til next week, dig in and explore!
- Support Team